

Wanna know how I create websites with zero coding skills and how you too can create your own blog too? Right away, I will share with you, the tactics I have used to build websites (for myself & others), received millions of visitors and loyal following and most importantly make money while I sleep – with little work (8 hours weekly).
The simple strategies I will share here have been proven accross many industries. And I’ll be straight with you, no B.S. If you follow most of the stuff I share, you too will create a successful website that receives taffic and makes money. How successful you ask … well, that’s up to you to decide. Sky is the limit!
So without further ado, let’s get started:
The 8 Simple Steps To Creating a Website
- Choosing a name for your website
- Hosting your domain
- Choose your Content Management System (CMS)
- Setting up your website using WordPress
- Customizing how your website looks
- Optimizing your website for search engines
- Publishing content (this brings us all our traffic)
- Making money from your website
In each step, I will highlight the most important methods I use. But, first, you need to decide what your website is going to be about (niche).
To help you figure out this, you will to brainstorm, meditate, think deepely or ask yourself these few querries; –
- What are you passionate about?
- What is your greatest area of knowledge?
- How can you help people?
- How do intend to make money on your website?
How To Create a Website and Make Money From It
Now that you have your dream idea for your website, here is a quick sneak peek on what we are going to do.
We are going to brainstorm a name for your site, register its .com and then get it to a web server so that it is visible on the world wide web (internet). A process known as web hosting.
After then, we will install the WordPress software (in a few clicks), pick a cool design for your site in just a click of a button. It is this software that makes it possible to build a website without any experience in coding or computer programming. In fact, all you need is just basic computer skills like typing, editing, proof reading, and so on.
This website software, called WordPress, which I’m sure, most of you are well aware of, is not only far superior to anything else I’ve seen, but it’s also easy to use, and it’s absolutely free.
WordPress originated as a blogging software, but over the years, it’s now more widely used to create any type of website, from an online store, to a sales landing page and above all, to publish content (blogging).
Content is king, it’s the first thing you have to focus on when you create a website. Before you can expect to make any money on your blog or site, you will have to attract people to your site and the best way I have found to do this, is to offer great free content. Don’t worry as we will discuss these nitty-gritties further down below.
If this sounds like something, that appeals to you… then let’s begin:
Step 1) Choosing and Registering a Domain Name
Before you do anything, you must decide on what you will call your website. Then you will have to register that name online (more of the same way you would register a business name, only that this time we will on it online in a matter of minutes). You can choose the extension you want for your website. It may be a .Com (or .co.uk. .org .net etc) – whatever you like though I recommend you register the .COM first. I own many domain names how I come up with the names is really simple. They are descriptive of what the site is about, so for example, YogaZone.com is about how to do yoga the right way and all other yoga related stuff.
You just have to be creative, anything really goes as long as it is memorable, descriptive, easy to spell or remember, related to your niche. Or it may just be something totally out of this world. Something like Google.com, Twitter.com, Hulu.com, NetFlix.com, Finance101.com . You just have to find something you really like.
For instance if you want to come up with a domain about baby care, just figure out what really are the goals of your blog? For our case if it’s a website teaching first time mothers about baby care. You can brainstorm a name like BabyCareTips101.com for your site. Or BabyCareZone.com, BabyCareBlog.com, BabiesHome.com or whatever it is that is in your mind.
Personally, I only go for a .Com (as it’s the most popular & easiest to remember) and I would also keep the name as short as possible.
To register your domain name, just head to a registrar website like NameCheap. Of course, there are many domain registration websites out there that you can use but personally I like NameCheap.
A domain will roughly cost you around $10 a year and is one of the most important things to never get wrong.
Of course, feel free to shop around and choose a different registrar, the only main difference between companies is the level of customer support. Otherwise no big deal. You can see below how NameCheap prices each domain extension you register for 1 year.
| .com | .org | .net | .co.uk | .info | |
|---|---|---|---|---|---|
| NameCheap | $10.69 | $12.48 | $12.88 | $7.58 | $2.99 |
Nevertheless, in the next step I will show you how you can get a domain for FREE (1 year registration). In case you want to register a domain for free, follow the next step below;
Step 2) How to Host Your Website on the Internet
Right now, your on my website right now, but for you to find this site on the internet, I have to host it on a server so that people like you can come and visit it.
You can setup your own remote server at home on your computer if you have the skills but I strongly discourage that. For a number of reasons; – if your computer shuts down, your website disappears from the internet, hackers can easily hack into your computer, your computer can crash due to overheating, someone may steal your computer, it’s expensive to maintain (power costs, 24/7 monitoring etc). Everything that can possibly go wrong, will. So don’t try be crafty with it.
To save you all these risks, you need to rent some space on a professionally run server for around $5 a month and can put all your files on it and thousands of people can come and visit it without any hassle on your blog. Just as you are reading this website page. That is what is reffered to as web hosting or hosting your website
The company that rents servers or offers web hosting services it known as a web host. I personally recommend you start with a company like HostPapa and that’s what you should use to host your website (but you can always choose anything else that you like as long as it is good and meets your needs). For the sake of this tutorial, we are going to use HostPapa. They have 24/7 live support with agents who will always be happy to help you with any issue you may have, their servers are very fast and secure, I use them for some of my new websites, user friendly, affordable and they will offer you 1 year free domain registration.
But above all, one of the main reasons why I recommend hosting with HostPapa, is because they have a tool in their user control panel, which allows you to install WordPress (website software) with just one click. I’ll take you through it, step by step below.
When ordering your hosting using any link from this page, you will get a special discount off your order.
When you purchase your hosting from HostPapa, they will send you an email and from it you will find two nameservers. If you happen to have already registered your domain name elsewhere with a registrar like (NameCheap or GoDaddy for instance), you will use these two nameservers to point your domain to the HostPapa server. You just need to login to GoDaddy or NameCheap or any other registrar you used, edit your domain settings and type in your nameserver address. Then your domain and hosting will be connected. Otherwise, if you registered your domain name with HostPapa, there is no need for this step. If you used NameCheap for example, you can see here how to point your omain name to HostPapa servers.
As I already alluded to above, there are lots of choices when it comes to hosting your website. Here is a selection of some well known hosting companies you can always choose between:
| HostPapa |
Superb customer service and very user friendly. | $3.95 (For basic blog or website) $3.95 (Ideal for small business owners) $12.95 (Unlimited Domain, enhanced security and speed) |
| LiquidWeb |
All our websites are hosted with LiquidWeb. | $119 (Hosting For WordPress) $150 (Scalable Websites) $159 (Dedicated Servers) $59 (Managed VPS Hosting with SSD) $199 (Fully Managed Dedicated Servers That Include Tons of Extras) |
| WPEngine |
Well known in the industry to offer great page speeds. Ideal hosting solution for higher traffic websites. | $29 (Personal) $99 (Profesional) $249 (Business) |
| MediaTemple |
Exceptional uptime and value with easily scalable plans for growing sites. | $20 (Shared) $20 (Managed WordPress) $30 (VPS) Managed Hosting and AWS Cloud Hosting – Call for Quote |


As you have seen, different web hosts offer solutions to certain types of sites. For starters I recommend HostPapa and here’s how you go about it:
1. Visit the HostPapa homepage.
From the page, scroll a little lower to see the different plans on offer. Alternatively, if you are certain that you want to solely use WordPress on your site from the onset, on the menu just click on hosting and select “WordPress Hosting“. Otherwise if you will or may want to use other software or basic coding then just follow through with these steps, – I will show you how to install WordPress.
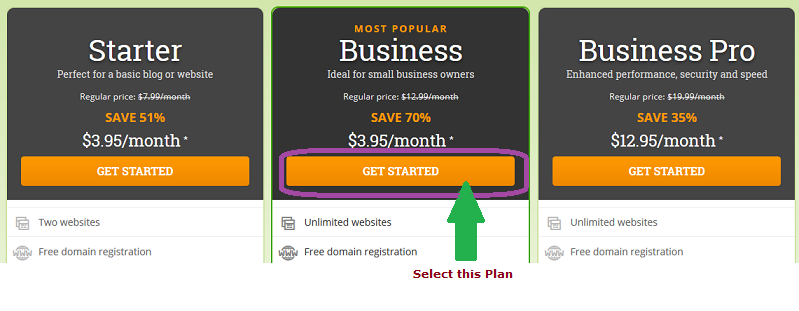
On the page you will find 3 plans as shown in the diagram below. I prefer going with the “business plan” because it offers more resources, best discounted and easily scalable when your business grows. So select the most popular plan “business“.

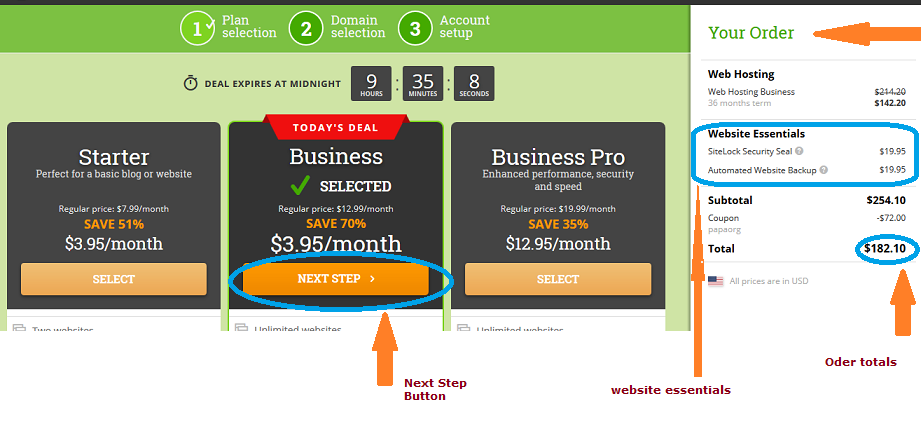
2. On the next page, you can now spot your order sub-totals on the right side of your screen. Let me explain guide you through it.
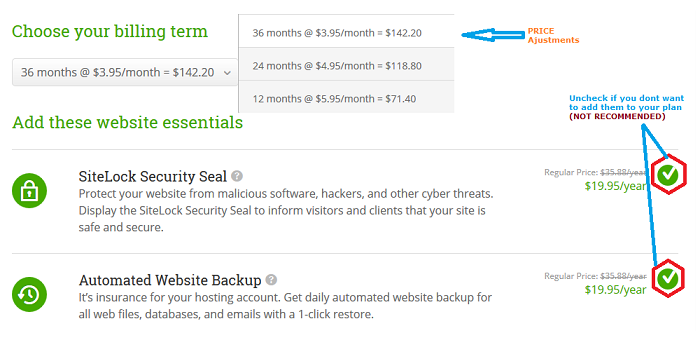
On this page, if you want to adjust anything on your website – this is the time. You can see that web hosting by default has been pre-selected for 3 years (which I recommend though you can change it). There is also a bill for SiteLock Security Seal and Automated Website Backup
Web hosting: You already know it’s use but I wanted to point something on the pricing. It is not cast in stone that you pay for 3 years hosting for your website (though I recommend it if you want to save more). Go for 3 years since, the prices renew at normal rates of $12.99/month. So if you host for let’s say 1 year, after that you will start paying for hosting at $12.99 when renewing your contract. That would be $155.88 per year but now you are being offered to host your website for $142 per year if you buy a contrant for 3 years. You can see the logic behind the math.
It is also important to note that web hosting services are billed on a yearly basis and that you cannot pay month to month basis. However HostPapa offers you a 30 days money-back guarantee meaning within the first 30 days, if you do not like their service, yu can cancel your plan and have them refund all your money within 24 hours. So that is some sort of security.
SiteLock Security Seal: This tool helps protect your website from malicious software, hackers, and other cyber threats. Display the SiteLock Security Seal to inform visitors and clients that your site is safe and secure.
Automated Website Backup: It’s insurance for your hosting account. Get daily automated website backup for all web files, databases, and emails with a 1-click restore. It simply helps you recover your site just incase something goes wrong (every site one in a while will experience this)

If you still wish to adjust the prices, maybe to fit your budget, just scroll down the page and make the change in as shown in the infographic below:

Once done, just click the “Next Step” button to move to the next task.
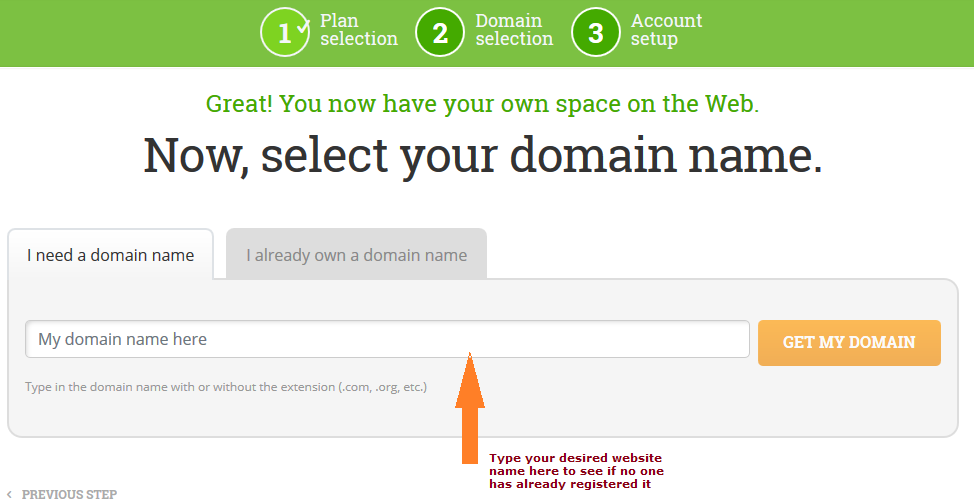
3. Domain Registration Process
Here you are going to register your domain (name for your website). By now I expect that you have an overview as to what a good domain should look like. If not, you can go back to our earlier lesson above.
Just type the name you desire and click the “Get My Domain” button to see if it has not been taken (available for registration) as illustrated below. Otherwise if already own a domain or have registered elsewhere, just select “I already own a domain name” and HostPapa will send you the NameServers for pointing your domain to their web servers.

Sometimes if you are trying to register a popular name, you will find that someone already got it ahead of you. As you can see below, I tried to register BabyCareTips101.com but someone already did, – she’s taken. So what do you do? Brainstorm or think of another name and see if it is available.

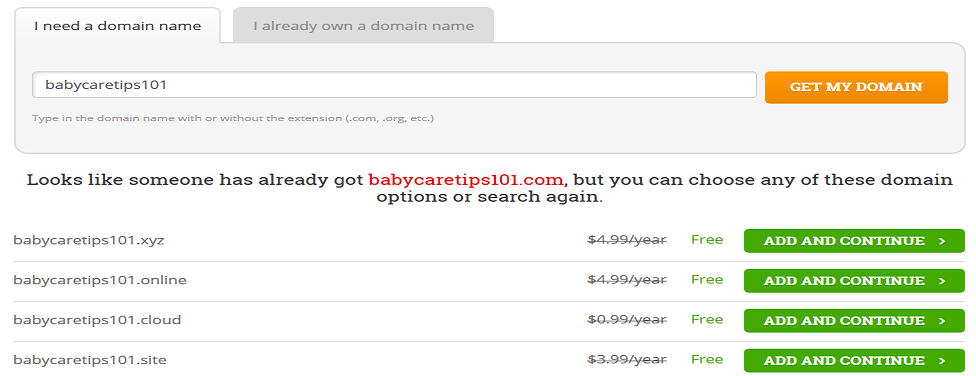
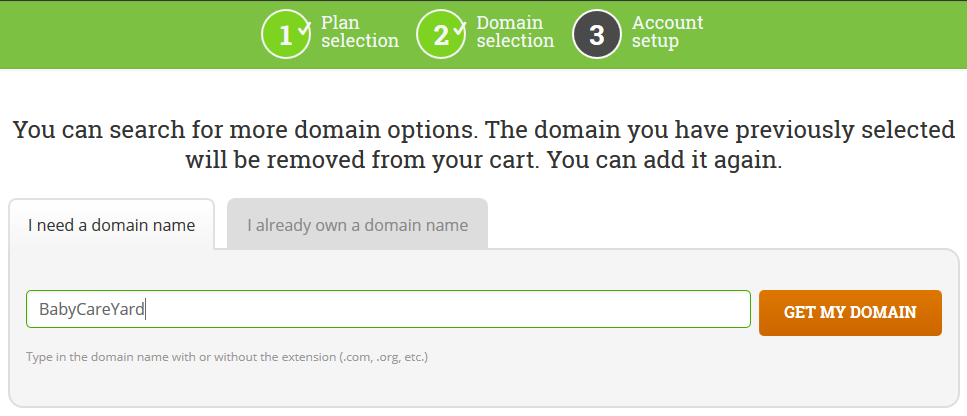
So let me try something else. Hulalaaa! BabyCareYard is available! Snap that!

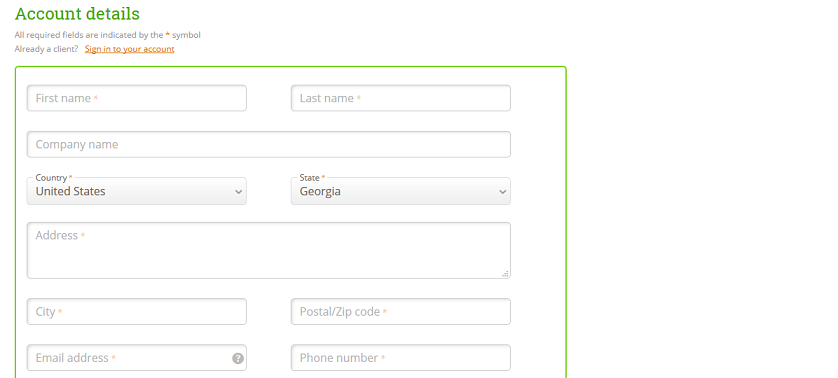
4. Fill Profile Details and Make Payment
I dont know about you but if your domain name is available, you will automatically be redirected to the next page where you will fill your personal and billing data. Otherwise keep trying a new name until you find one that is available.
You should see some window with details like the one below:
You should fill your account details here. When done, you will move to next phase where you make your payment.

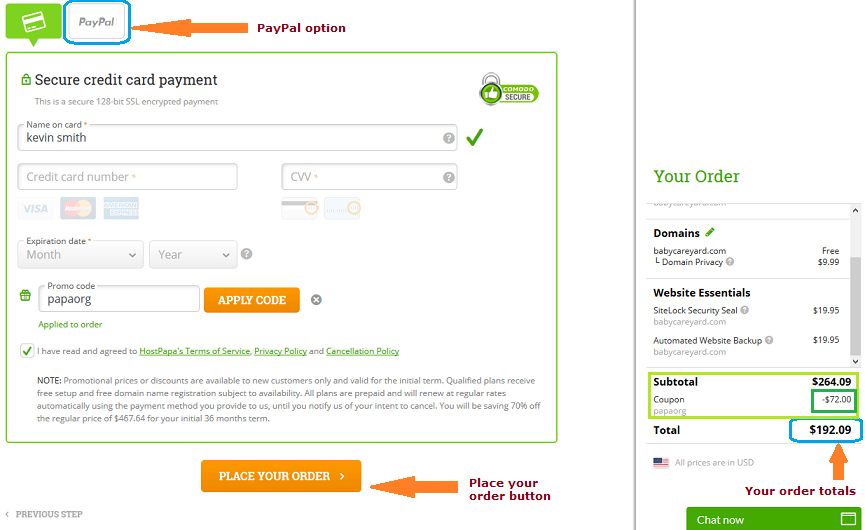
On the billing section shown below, you can choose to pay with your card or PayPal. It is important to note the additional $9.99 on your cart, for domain privacy.
Domain Privacy ($9.99): Is to shield your personal information from unauthorized access from those that do not possess the legal authority to obtain this information. So it important to have it.
Additionally, you should automatically get another discount worth $72 off your total order if you used any link from this page to access HostPapa as you can see on the cart.

If you followed every step correctly upto this point, then you should be able to visit your website from any browser. Just type YourSiteName.com and you will see you site, yeeeah!
But if you registered your domain elsewhere then you need to point them to HostPapa servers. If done correctly, your domain will take upto 48 hours to propagate on the wolrd wide web before you will be able to visit your website.
At this point we can move to the next step, or you can take a 24 hours break before continuing to the next step. Just to let things set up. Bookmark or save this page for the next steps. Otherwise if you are ready let’s move to step 3.
Step 3) Choose your Content Management System (CMS)
Before you can even start worrying about how your website will look like, you’ll need to choose your Content Management System (CMS) or platform.
There’s a lot to choose from. You are able to make a site with many different platforms, such as WordPress, Tumblr, Blogger and more…
However, given that there are over 72 million active users using WordPress today, it’s clear which platform rules. Below is a graphical represantation of the most preferred platforms by the top one milion websites in the world:

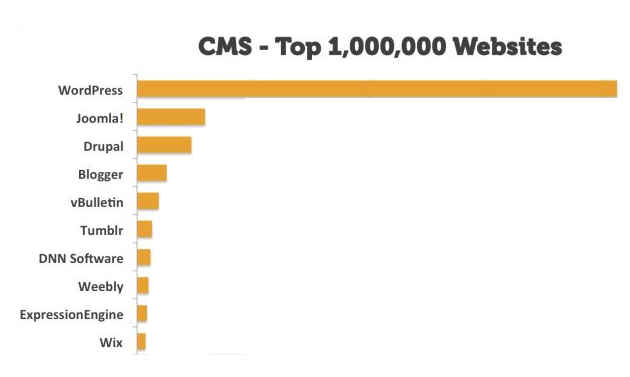
While the other platforms are generally all pretty OK, nothing has ever come close to matching the freedom and customization options that WordPress offers. So without a doubt, go with WordPress; especially when you are just starting out.
HOLD UP! At this point, you don’t need to install nor download anything – I’ll show you this in a minute, but first…
Why you shouldn’t make a site on a free platform
Without a doubt, you need to self-host your WordPress website like we did above on HostPapa. If you haven’t please do it as soon as possible.
Think about it – what famous, successful blogger you know is using a free blogging website like “startbloggingonline.freeblogs.com” instead of own domain name like “StartBloggingOnline.com”, for example?
It’s not just that – free blogging platforms have other problems too – including…
- You don’t control your content – the blogging platform does. They could shut you down any time, and for any reason. Don’t believe me? Read this.
- The web address of your website will be long and hard to remember (like yourfreeblog.blogspot.com) instead of a catchy, branded address you choose.
- You’re not allowed to advertise on most free blogging platforms, making it much harder to ever make money from blogging.
All of these limitations apply to the WordPress.COM websites. What you really want is to self-host a WordPress site – it’s the same software without all the limitations!
Don’t get me wrong: If you really don’t care whether or not your site will be successful, go with free blogging platforms. They’re an okay way to try out blogging for a little bit.
But if you ever want to look credible, build an audience and make money with your website, then you need your site, on your own domain name, with your own hosting. That way, you make the rules and control your content.
If I were you, I’d start with a self-hosted website on my own domain from day one. Setting up a website like this is WAY easier, and worth it.
If you’ve already followed the steps above, let’s see how to set up your site with WordPress (without any coding knowledge).
Step 4) Setting Up Your Website
Next I will show you how to install your website in less than 30 seconds for FREE, something I have seen programmers charge as much as $500 to do.
I recommend everybody uses WordPress to run their website. It’s the most popular website platform and is used by more than half of all new websites. I use it and it doesn’t matter if a site is big or small, it’s the best choice.
Back when I started, installing website software would be no easy task. You would have to upload thousands of files and learn lot’s of technical stuff, which no one wants to do.
However, now all you need to do is login to your hosting control panel and select WordPress >> Install, less then 30 seconds later your blog is installed, you have a website on the internet and you can start publishing content.
You can install WordPress in a variety of ways, with options for those seeking simplicity or ultimate flexibility. In this guide, we’ll walk through each method, step by step.
If you used HostPapa as your web host, the Softaculous App Installer, available from My cPanel, supports an easy, one-click installation of the WordPress platform.
Log in to your HostPapa Dashboard and select My cPanel from the top menu, then scroll down to the Softaculous App Installer section (You should find your login details in the email HostPapa sent you when you signed up).
On your cPanel, scroll down to the section named “Softaculous App Installer“


Look for the WordPress icon and click it to proceed. On the next page similar to the one captured below, just click on “Install Now” button

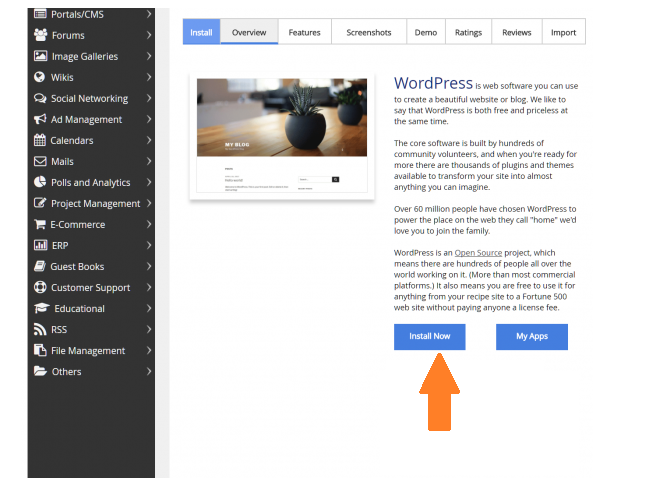
You’ll see a description of your selected application. Use the tabs at the top of the page to find out more about the WordPress platform, then click Install Now to proceed.

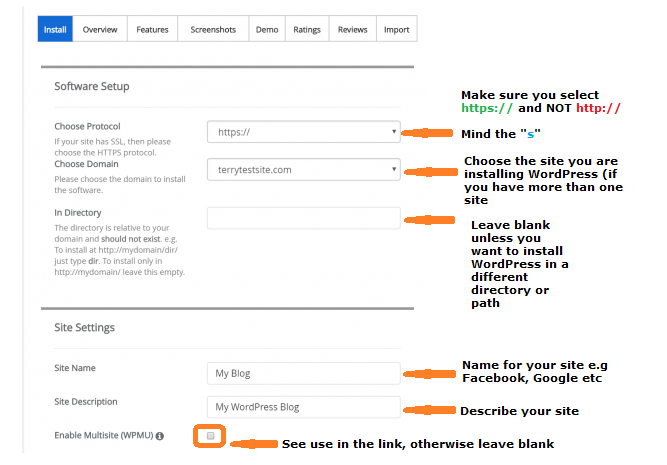
Work through the Software Setup form to configure your installation settings.
- Choose Protocol – select the standard http:// or secure https:// for your WordPress installation if you have an SSL certificate. (If you hosted your site with HostPapa, then you will get a FREE SSL certificate, so choose https:// protocal)
- Choose Domain – select the domain on which you wish to install WordPress. If you wish to use a subdomain, see the note below.
- In Directory – select the directory for your WordPress installation. This directory should be new and should not exist.
- Site Name – enter a name for your WordPress blog.
- Site Description – enter a description for the blog.
- Enable Multisite (WPMU) – check this box if you wish to create a WordPress Multisite installation. Find out more about WordPress Multisite in this HostPapa knowledge base document: How to install a WordPress multisite network on your HostPapa account
- Admin Username – enter a username for your WordPress administrator account.
- Admin Password – enter a password for your WordPress administrator account.
- Admin Email – enter an email address for use with your WordPress administrator account. This account must be valid and active.
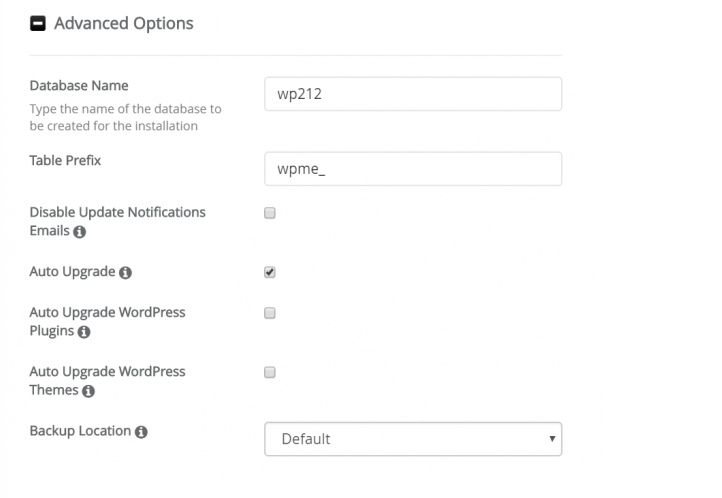
By default, Softaculous will automatically configure the Database Name and Table Prefix associated with your WordPress account. Click the Advanced Options link if you wish to configure this yourself, along with your software upgrade preferences.

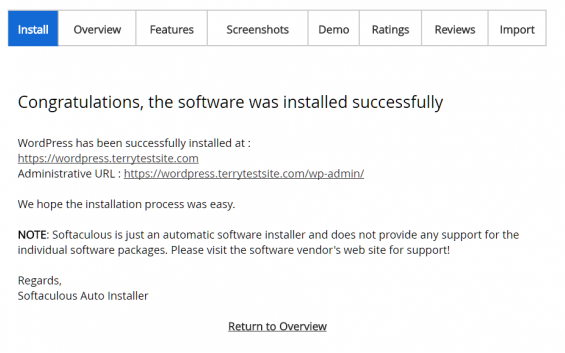
Select a theme, then click Install to proceed. The installation takes a few seconds, after which you’ll be shown a link to the WordPress administration dashboard. Click the link and log in to the dashboard to begin working on your site.

In the next step below, we are going to customize how our website will look like. We are going to design it (and yes, no coding experience is needed).
Step 5) Customizing How Your Website Looks
At this point, your website should look something similar to this. (The designs may be different, depending on which free design WordPress are offering pre-installed at the time.)
Once you’re inside WordPress dashboard, you can start customizing your website. We’ll go through everything you need to do to get your website ready and your first post published today.

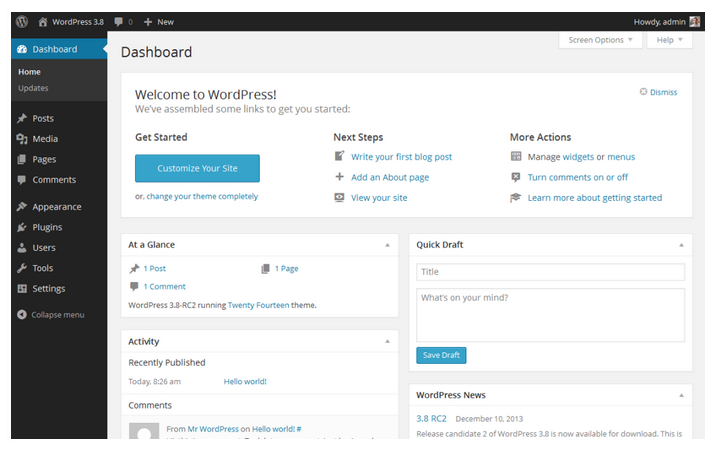
You should get familiar with the look and items of the WordPress admin menu. Here are the various admin menu items:
- Dashboard – This is the page you see right after logging in.
- Posts – Here you can write and publish new website posts and view and edit old ones. We’ll go through this once we’ve set up the site otherwise.
- Media – This is your media library with all the images, PDFs, videos, etc. you’ve uploaded.
- Links – Many websites don’t use this at all. You can skip it for now.
- Pages – Here you can write and publish new pages and view and edit old ones. We’ll look at this after choosing your site design.
- Comments – Everything related to comments. You can get familiar with this when you’ve published your first post and readers leave the first comments.
- Appearance – Here you can change what your site looks like. We’ll go through this in detail below.
- Plugins – Here you can add and remove plugins, which add functionality to your website. We’ll go through this after selecting the theme.
- Users – If you make your content with others, you can add them as users here, so they can edit posts. Otherwise, you can skip this for now.
- Tools – Here are some additional tools you can use for publishing posts. You can skip this for now.
- Settings – Here you can edit your site’s settings. We’ll look at the essential settings later.
To learn more about each one of these (and see screenshots) check out this article from WordPress.
Choose a FREE Theme for Your Site
I think choosing your new WordPress site design is the most fun step.
The good news:
- You can do it all on your own.
- You can get a FREE WordPress theme that makes your website look great.
- You can change it later (just don’t change it so often that your readers can’t keep up).
The bad news:
- You can spend a LONG time looking for the perfect theme.
- A WordPress theme is responsible for how your website looks, so it’s an important decision.
In other words, a WordPress theme is like your car’s frame. It changes how the car looks, but doesn’t impact the features or performance too much.
Luckily for you, WordPress has thousands of great-looking themes already optimized to fit any brand, niche, or industry.
Here’s what to look for in a WordPress theme:
- Simplicity: Unclear design makes it difficult for readers to navigate your website.
- Responsiveness: The theme needs to adjust its layout across different screen sizes and devices. In the highly mobile world we live in, responsiveness is a necessity.
- Speed: Although most themes don’t slow down your site significantly, it’s still good to test it. To test a theme’s speed, use the Pingdom Website Speed Test, enter the URL of the theme’s demo, and see how long the page takes to load. If the load time is longer than three seconds, you might want to find a different theme (ideally, the load time is below two seconds).
- Ease of customization: It should be easy to customize the theme—otherwise, you’ll struggle every time you want to tweak something. Fortunately, many themes offer plenty of easy customization options.
- SEO readiness: The theme shouldn’t make a huge difference to search engines. But it’s still better to choose a theme that’s designed with SEO in mind. (Look for “SEO Optimized” or “SEO ready” in the theme description.)
- Security: Themes don’t generally make security issues. But it’s anyway good to check some user reviews and comments—and while doing that, check if people have had security problems with the theme.
Keep these factors in mind when choosing a theme. But most importantly, pick something you love and want your readers to see.
By using WordPress, you are now able to use over 100,000 already created blog designs. Some free and some much better that come at a small cost.
I recommend you go to ThemeForest and look through their theme library of over 30,000 designs.
Once you have chosen and downloaded your blog theme, you need to log into your WordPress admin area. Then click Appearance on the left side, then click Themes. Click upload, find your theme and once installed, active it.
With most good blog themes, you get a custom dashboard to edit the look and feel of the theme. On the left hand side of your WordPress admin area, click the blue button with the name of your theme on it. In here you can edit almost everything, it’s all very self explanatory, go through it and make the changes you want.
Next, click on Appearance >> Widgets on the sidebar.
Here you can move things around, adding, editing and removing widgets on your blog.
A widget is like a gadget or an attachment. Something not required for the site to function but can be used to improve it in some way. An example of a widget could be, an advert, an email signup box or popular posts.
Here’s how my blog looks now:
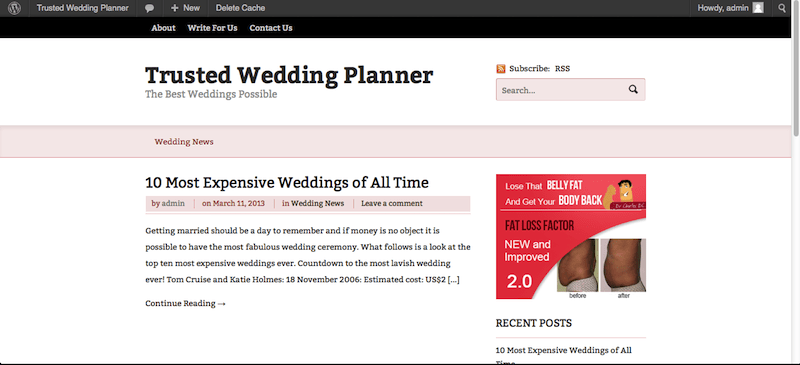

Here’s an example of what your website could look like immediately after following this guide:


This is a typically look I go for when I create every new blog, including IncomeDiary. I keep it simple, I make it usable. Then once the site proves itself, I invest more money and time into it. This way, I risk little up front, but using a few great resources, still manage to build a professional looking site.
Step 6) Optimizing Your Website For Search Engines
The majority of our website traffic comes from Google.
To rank high in Google, you need to work on your websites search engine optimization.
It’s best to get this step right from the very beginning because it will save you a lot of time in the future, not to mention you will get a lot more traffic sooner. Here’s a list of our top SEO tips for new websites:
- Install Yoast SEO Plugin for WordPress.
- Choose your permalink settings, I recommend /%postname% – this will mean your blog posts URL’s will display as domain.com/postname – a lot of bloggers include category or date in permalink, but this is not something I would recommend because it makes it difficult to change categories or dates as it will change the URL.
- Research keywords using Ahrefs. Keywords are the search terms you want to rank for in Google. Ahrefs tells you which keywords get what amount of traffic.
- Make sure to add links in posts to other pages on your site and other peoples sites in posts. This helps Google figure out what your content is about and helps reduce bounce rate.
- Don’t have duplicated content.
- Add a sitemap to your website.
- Don’t have broken links on your website.
- Make sure your website is as fast as possible.
- Google ranks websites higher for having HTTPS / SSL websites. Some web hosts offer this for free.
Step 7) Publishing Content
We have a lot of articles about creating content. I would say, 80% of getting traffic to your website is about creating the best content possible.
Examples of content you can create:
- How-to guides
- Interviews
- Top lists
- Videos
- Podcasts
Our biggest tips for making sure your content brings lots of people to your site is:
Do keyword research. If you choose keywords that no one is searching for, then you shouldn’t expect people to find your articles.


Above you can see a screenshot from Ahrefs. Using this post as an example, I searched for “How to create a website”. You can see in the top right corner, that it gets 119,000 searches a month.
That’s a lot of traffic!
Perhaps to much traffic because the more traffic a search term gets, usually means the harder it is to rank for.
On the left side you can see that I will need 259 websites to link to this article to rank in the top 10. Now this is a lot because it’s a very competitive search term, but it’s not impossible.
Getting backlinks is mainly down to creating great content. If you can create better content then anyone else that ranks for the same search term, then you have a good chance of ranking high in Google.
But how do you actually Publish the Content on your Website?
Okay, now you should be all set up with WordPress. So, now for the fun part – it’s time to make your first website post! I’ll take you through each step of this process to make it easy for you.
Go back to your WordPress admin panel (http://your_domain.com/wp-admin/) and then to “Posts » Add New” (or “Pages » Add New) from the left sidebar.
What you’ll see is a very friendly editor screen that should remind you of MS Word or Pages on Mac:

Let’s break down what you’re seeing here:
- Title Area: This is where you write the title of your post.
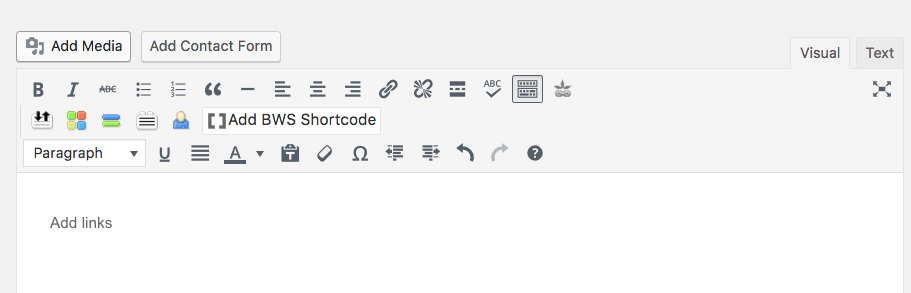
- Content Area: This is where the body text of your post goes. The whole area works just like text editing in Word or Pages. You can also add images and other media to your post by clicking the “Add Media” button.
- Standard Editing Tools: Here are options like bold, italic, lists, paragraphs, and headlines.
- Publishing Tools: This is where you get your post shown to the world; chief among them is the big blue “Publish” button. You can also set a publication date to schedule your post in the future or save the post as a draft for more editing.
- Additional Fine-tuning Tools: Update your website post and categorize it (you can learn more about WordPress categories and tags here).
Here are a few things to keep in mind:
Adding links to your posts: You should use outbound links to other websites when needed to back up your claims. For example, if you’re writing an article about meditation, you can link to a study that showed that meditation helped people feel calmer. To add links to your posts, highlight the desired text, then scroll up to the website menu.
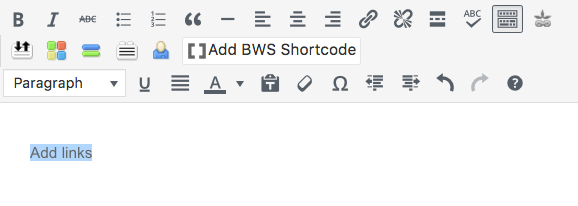

Click the paperclip-looking item to the right of the “Align right” item (above the “Add BWS Shortcode”).
![]()

From there, add the URL you want to link to:
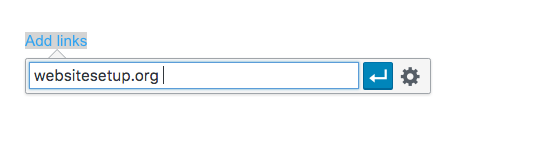

Then, click the Settings icon on the right (the wheel-looking item above, next to the arrow).


Click the “Open in link a new tab” box. This is important—you don’t want people to leave your site when they click on a link!
Adding Images to your posts: I touched on this briefly before, but I’ll explain it more here. Start by scrolling up to the top of the site menu and click “Add Media”.

From here, select the files you’d like to upload. You can find previously uploaded files from the “Media Library” at the top-left corner next to “Upload Files”.
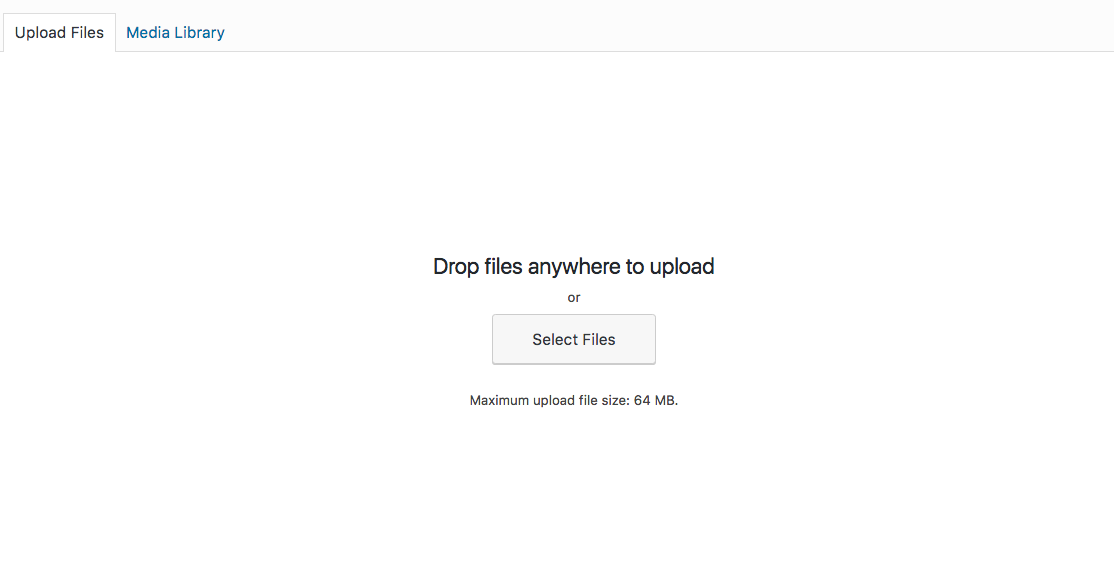

Once you’ve uploaded an image, you can choose its size and placement.
To add a featured image (the image that will be at the top of your post and in the thumbnails of your article); scroll to the right sidebar of your website menu. You’ll see an option titled “Set featured image”. Click that, and then go through the same uploading process to add in a featured image here.
Adding videos from YouTube: Adding in a video can spice up your post. This process used to be a bit complicated, but after some recent WordPress updates, it’s easy.
All you have to do is copy the YouTube video URL into the content area. Make sure that the URL is on its own line and not clickable. When you publish the post, the video will appear. I told you it was simple! Our friends at WPBeginner have a guide for this if you need any further help—check it out here.
Creating the slug: Your slug is the URL of the post. You want to make this slug clear and concise. This will make it easier for people to share it on social media, and overall it will just look better.
You can find the slug underneath the post title. It will say “Permalink: http://yourdomain.com/post_title”.
Sometimes, the title of your site post will make the perfect slug. But usually, it will be too long, and you should change it, so that it’s no longer than 2-4 words.
Here are some tips for optimizing your WordPress slugs:
- Target SEO keywords. Think of what people would type to Google when they search for the information you share in the post—those are SEO keywords.
- Avoid duplicates (make sure it’s not the same as another slug on your website).
- Don’t change the slug after publishing the post (unless you absolutely have to) as this will result in lost traffic.
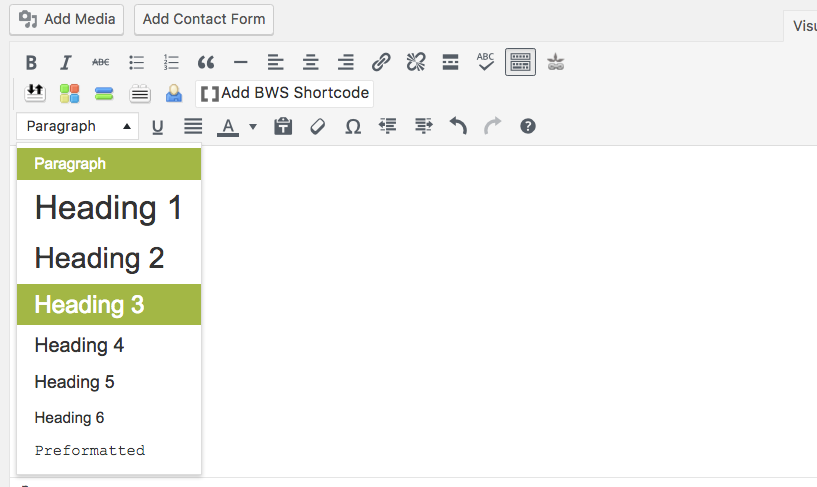
Adding headings: Headings help you structure your content and make it easier for people to read. Consider adding headings for each of your main points.
To add a heading, scroll up to “Paragraph” drop-down menu. Select the heading you’d like to use. Note that the “Heading 1” is usually reserved for the post’s title, so stick to the smaller headings (with larger numbers) inside the post.

Publish Your Post (or Page)
When you’re done working with your post, click the “Publish” button and then the “View post” link that’s going to appear at the top of the page (you’ll see your post live on the site).
Congratulations! You just published your first site post. Before you share it with others (which is the next step), let’s add a simple tracking system to your site, so you’ll see exactly how many people you’ve reached.
Need More Help?
I normally receive lots of emails daily but I try as much as possible to get back to you, send me a message and I personally or someone in charge will help you out.
Step 8) Monetizing Your Website
In our experience, the best way to monetize a website is to create and sell your own products. However, when you first start your website, this is often not possible because you need to spend most of your time creating content.
What I would suggest to anyone with a new website is, build an email list and focus on monetizing your website with affiliate links.
An email list lets you collect emails from readers so that you can email them later.
Affiliate marketing is when you promote someones product and receive a commission when people buy through your link.
To get a good idea of all the different ways to monetize a website, check out this guide for making money online.
Articles To Help You Create Your Website
Now you have set up your website, it’s time to learn and implement the things that will drive traffic to your website and make you money.
Publishing Content That Drives Traffic
Content is why someone visits your website, creating great content will mean more people will visit your website. Would you still be reading this website if it wasn’t for the great content? NO! Write well and people will come.
- How I Get Over 100,000 Visitors a Month With Top List Articles
- 7 Lessons From 50 Blog Posts That Send Me The Most Traffic
- 10 Article Headline Examples That Got Us 10 Million Readers
- How To Write a Blog Post That Gets Incredible Results
How To Get People To Visit Your Website
What is the point of creating a website if no one visits it apart from yourself and a few close friends. I have published some great posts about how to drive traffic to your blog. Without traffic, you can’t make money, without great content, people won’t stay long enough to earn you money. Do you see how this is all coming together?
- My top 3 blog traffic secrets, fastest way to get 1000 visitors per day
- 10 Best WordPress Plugins For Getting More Traffic To Your Website
- The Beginner’s Guide to Seeing Massive Pinterest Traffic
- How To Drive Traffic From Facebook Fan Pages
How To Make Money From Your Website
I create websites because it’s my passion but I don’t think I would enjoy it as much if I didn’t make so much money from it, here are my favorite articles that I wrote related to making money from a website.
- 14 Ways To Actually Make Money From a Website
- 9 ‘Set and Forget’ Ways To Increase Sales On Your Website
- The 5 Best Ways To Grow Your Email List Fast!
- 10 Ways To Increase Your Affiliate Sales
How To Make Your Website Even Better
I’m a perfectionist and I know every improvement I make is going to mean more traffic to my website which in turn will make me even more money, here are some posts to help you make improvements.
- 18 Website Optimization Tips For More Traffic and Higher Conversions
- 13 Expert-Level Blog Design Tips for Beginners
- 24 Rules I Follow When Creating Successful Websites
- 16 Ways To Speed Up Your WordPress Website Today!
Blog Posts To Inspire You To Work Harder
We all struggle to keep motivated, personally I’m at the point with my business where I don’t have any financial worries so it’s hard for me to find a reason to keep working because to be honest with you, I don’t. I do however because I’m motivated by success, you may be the same or you may not be making money yet and want to get to this point. Here are my favorite posts to inspire and motivate you to keep pushing forward.